How to setup Flowroute T.38 fax service with FaxTalk

FaxTalk FaxCenter Pro 10, FaxTalk Messenger Pro 10 or FaxTalk Multiline Server 10. You’ll also need a high speed internet connection and an account with flowroute.com No telephone line, no wiring or fax modem is required. You can download a free 15-day trial version of FaxTalk products here
Register and setup the account with flowroute.com
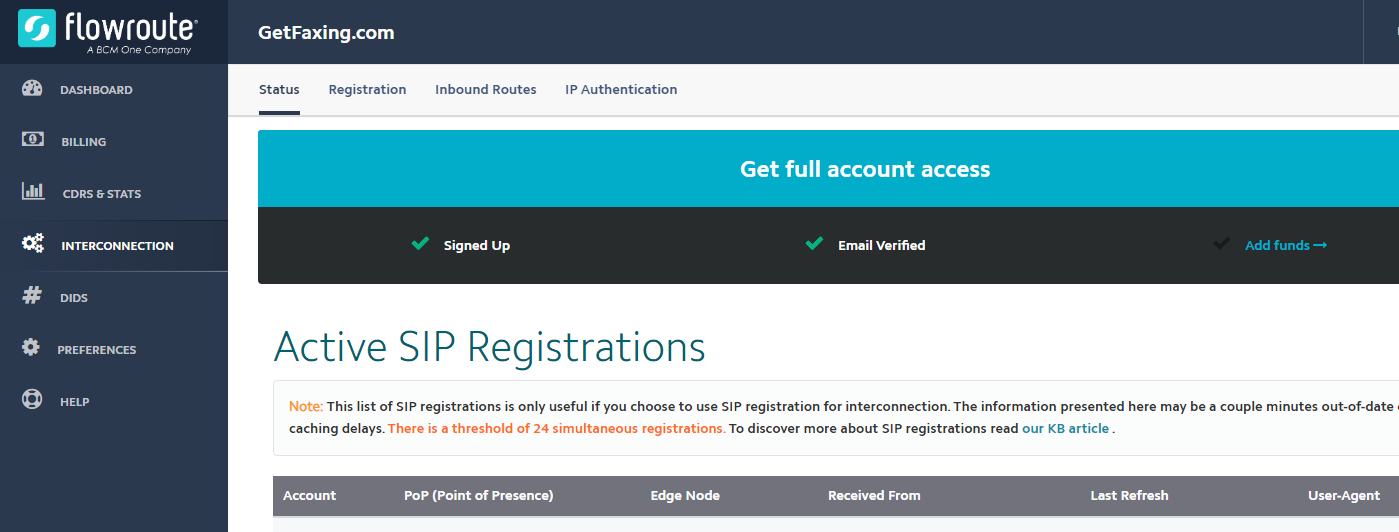
Register your account with Flowroute. From the Flowroute web portal, click on Interconnection -> Registration to obtain your SIP credentials. Note your username/auth Username and password and ensure “Enabled for Outbound’ is active. If you do not have SIP credentials available, click on Preferences -> Fraud Control. Enable Outbound SIP Credentials option.

Purchasing a fax number to receive faxes
To purchase an incoming DID (a phone number), Go to DIDS Select your telephone number. This will allow you to receive faxes. Contact the service provider regarding porting existing fax numbers.
Enable T.38 Fax in FaxTalk.
If you have FaxTalk Multiline Server 10, you can enable multiple connections and use a combination of up to 8 fax modems and T.38 fax service providers. FaxTalk FaxCenter Pro 10 and FaxTalk Messenger Pro 10 will only allow one type of connection.
NOTE: If you currently use a fax modem with FaxTalk FaxCenter Pro 10 or FaxTalk Messenger Pro 10, it will be replaced by the T.38 fax service.
In FaxTalk, Click on the Tools menu, click Options. Click Connection. Select the device on the list you wish to change, click Change. Change the drop-down menu selection to “Select a T.38 Internet Fax connection“. Type a name of this connection in the Name field, for example you enter “Flowroute.com” or your account/fax number. Click Next. FaxTalk will now check and verify your LAN/Internet connection. Click Finish.
Configure your Flowroute.com account in FaxTalk.
You should now see the connection name you entered above, with the status Enabled. Select this connection name and click Properties. You will need the account information provided by Flowroute.com to continue.
The Connection Properties dialog box should now appear.
In the Local IP Connection Settings Tab.

Check Use SIP and set Port 5060 (Default)
Use H.323 (unchecked/disabled) Port: 1720 (Default)
STUN Server: Not used, leave blank.
Additional Options: Leave blank unless otherwise requested to add options by technical support.
Use this connection for “Sending and Receiving”, “Sending Only”, or “Receiving Only”. Select your preferred option.
Port Range for RTP: 5000 To 5200. The default is 5000 to 5200.
IP Address: Enter your local IP address (example: 192.168.1.2) or leave blank.
In the Remote IP Connection Settings Tab.
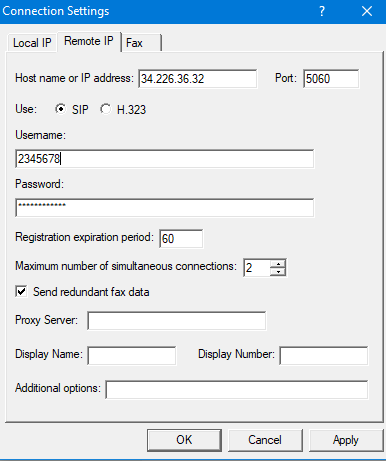
Host name or IP address: Here you enter the host name or IP address for the remote T.38 fax server. Enter the preferred IP address/host you want to use. Flowroute.com uses the range of servers: 34.226.36.32 - 34.226.36.47 for east coast USA, and range of 34.210.91.112 - 34.210.91.127 for West Coast USA. Please verify for latest Host Names/IP Addresses from the Web panel at Interconnection -> Registration
Port: Enter the port number for the remote T.38 fax server. The port number is 5060.
Use SIP: Enable this option to use the SIP protocol to T.38 fax operations.
Username: Your Auth Name contains your 8 digit account number. Example: 12345678.
Password: Enter the password provided to you here.
Registration expiration period: 300. Sets the period of time, in seconds before the SIP registration expires and re-registration occurs to remain active.
Maximum number of simultaneous connections: T.38 providers support multiple simultaneous connections for fax operations. FaxTalk supports up to 30 connections. The number of simultaneous connections is determined by your T.38 fax service provider based on their plan offerings. Enter an amount between 1-30 here.
Send redundant fax data – Enable this option to send the previous data packet along with the next data packet to ensure there is no data loss during transmission. Having this option enabled does add additional overhead to the data transfer process when sending faxes.
Proxy Server – You can leave this blank unless the provider indicated that a proxy server is used/required.
Display Name/Display Number: This is Caller ID information. Leave blank or enter your Caller ID and Fax number here.
Additional Options: none required.
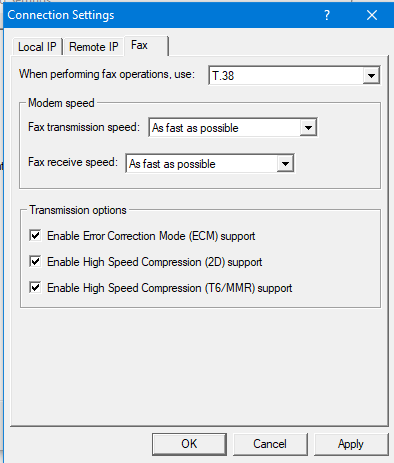
In the Fax Settings Tab.
When performing fax operations, use: T.38 Fax
Specifies the Internet fax standard FaxTalk should use when performing fax operations. Default is T.38 Fax.
Fax transmission speed: Specifies the maximum speed at which you want to transmit faxes. The maximum speed for T.38 fax is 14,400 bps.
Fax receive speed: Specifies the maximum speed at which you want to receive faxes .The maximum speed for T.38 fax is 14,400 bps.
Note: Normally you would want to send and receive faxes at the highest speed possible but in some cases you may encounter a fax machine that has problems sending or receiving faxes at high speed and you’ll need to lower the speed to properly receive the fax.
Transmission options
Enable Error Correction Mode (ECM) support – Enable this option to use Error Correction Mode (ECM) when sending or receiving faxes.
Note: Error Correction Mode provides a more reliable fax transmission by verifying the data received is the same as the data sent.
Enable High Speed Compression (2D) support – Enable this option to use high-speed compression (also referred to as MR or G3-2D encoding) when sending or receiving faxes.
Note: Using 2D compression will result in significantly reduced transmission times since the data being transmitted is compressed. In some cases, you may find that some fax machines have problems receiving faxes when 2D compression is enabled.
Enable High Speed Compressions (T6/MMR) support – Enable this option to use CCITT Group 4 compression, also referred to as G4 or Modified Modified READ (MMR) defined in the ITU-T T.6 fax standard. Provides more advanced compression compared to the Group 3 MH and MR compression formats.
Verify the Registration Status in Flowroute
Verify the connection by clicking on Interconnection -> Status. FaxTalk should appear registered with the active IP address and FaxTalk user agent.