Forwarding faxes as e-mail to your mobile device, or another e-mail recipient

FaxTalk can send e-mail notifications of faxes and voice messages. It can also include the message as an attachment in PDF, TIFF, or WAV format. To send e-mail, you can use an e-mail client (32-bit only) or use a SMTP or IMAP e-mail server. Your e-mail provider (gmail.com, outlook.com, bell.ca, etc.) will give you details on how to connect to your e-mail account using SMTP or IMAP.
FaxTalk will work with many popular 32-bit MAPI compliant e-mail clients. These clients include Microsoft Outlook, Microsoft Outlook Express, Windows Mail, Windows Live Mail, and Mozilla Thunderbird.
NOTE: If you are using a 64-bit e-mail client, it will not work with FaxTalk. Install a 32-bit e-mail client or use the SMTP or IMAP server option instead.
To enable the email support in FaxTalk:
Using SMTP or IMAP Server.
- Open the FaxTalk software and click on the Tools menu and click Options.
- In the configuration list on the left, click Email.
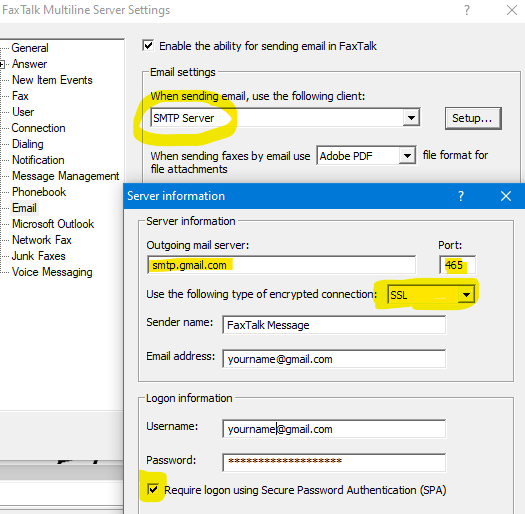
- On the Email configuration page, check the Enable the ability for sending email in FaxTalk setting.
- Select SMTP Server or IMAP Server from the option “When sending email, use the following client list of available supported email clients”.
- Select the format for the fax to be converted when attached to an email from the When sending faxes by email use list.
- Click Setup… to enter the server information
- Enter outgoing mail server name, port and encryption type. Example for gmail is: smtp.gmail.com, Port 465 and SSL Encryption.
- Enter the Sender Name (name that appears on the e-mails)
- Enter the Email address (this is the email address that will be appear on the e-mails)
- Enter your Logon information for the SMTP or IMAP server.
NOTE: If you use GMAIL account, you must use an App Password and enable 2 factor authentication in your Google Account. See myaccount.google.com/apppasswords for more information. If you change your Google password anytime after you’ve created an app password, you will need to regenerate a new app password. - Enable logon using Secure Password Authentication (SPA)
- Click TEST to ensure all settings are correct. If any errors, confirm settings and re-try.
- Create the email notification rules as required. (Follow instructions found in the Create the email notification rule)
Create the email notification rule.
- Open the FaxTalk software and click on the Tools menu, and click Options.
- In the configuration list on the left, click Notification.
- On the Notification configuration page, click New to create a new notification rule.
- From the list of available notification rule types, select Notification by Email and click OK.
- Enter the name for the email notification rule in the Use the following name for this rule field.
- In the Email address field, enter the desired email address where the notifications should be sent. Click the phonebook button to select an email address from a phonebook.
- Enter a subject in the Subject field for the email notification. This subject will appear in the subject line of the email message.
- Select the type of items received from the Perform notification after receiving list that will trigger the email notification rule to be processed.
- Check Include a copy of received items with the notification. Select this option if you want received items to be included when notification is sent.
- Select Forward a copy of received items if you want only a copy of the received item to be included when notification is sent (the items remain in the FaxTalk Inbox. Check Mark items as read after notification. This setting ensures the attached received items are automatically marked as read in FaxTalk. This happens when they are forwarded with the notification. Select Move items when forwarding if you want the received items to be included when notification is sent. They will be removed from the FaxTalk Inbox.
- Select the number of items that need to be received before the fax notification rule is triggered.
- Click OK to save the changes to the email notification rule.
- Click OK to close FaxTalk Settings.
SMTP Settings
If you select SMTP (Simple Mail Transfer Protocol) Server, you will need to enter the outgoing mail server. You will also need to enter the port. Usually, this is port 465 for SSL encrypted connections. Contact your e-mail provider for e-mail SMTP server settings.
Using a 32-bit e-mail client
Enable email support in FaxTalk and select a 32-bit email client to use. Then you will need to create an email notification rule to have received faxes forwarded to an email address. Instructions are provided below.
Note the newest versions of Outlook will install a 64-bit client by default on 64-bit Windows OS. More information on how to check which version of Outlook you have installed.
- Open the FaxTalk software and click on the Tools menu and click Options.
- In the configuration list on the left, click Email.
- On the Email configuration page, check the Enable the ability for sending email in FaxTalk setting.
- Select the desired email client to use from the When sending email, use the following client list of available supported email clients. FaxTalk will automatically detect which 32-bit e-mail clients are installed. If your client does not appear in this list, it is not compatible. Outlook may appear on the list, but it will not work if it is the 64-bit version installed. See above link to check version of Outlook.
- Select the desired format for the fax to be converted when attached to an email from the When sending faxes by email use list.
- Click OK to save the changes and close FaxTalk Settings.
- Create the email notification rules as required (follow instructions the section named Create the notification rule)
no comments