Using Voice Software with the Conexant USB Voice Fax Modem.

If you’re using Voice, Caller ID, Alarm notification or other voice-related programs, you’ll need to install proper voice modem driver. This is especially true if the software uses direct TAPI to play and record audio over a phone line.
This guide will walk you through installing the correct drivers for your GetFaxing.com fax voice modem. GetFaxing.com Fax Voice Modem Drivers are exclusive to GetFaxing.com and are included when you buy a fax voice modem from us.
First time install.
Insert the GetFaxing.com Conexant USB Modem or the GetFaxing Conexant Dual Jack USB Modem into an available USB port. We recommend inserting the USB modem into an available USB 2.0 or older port, without the use of any USB hubs. For first time installations, Windows will install the modem automatically. It will be named “Conexant USB CX93010 ACF Modem“.
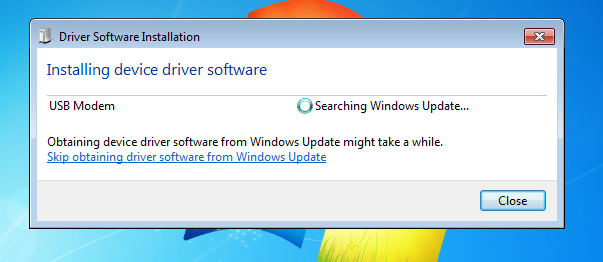
This Windows default modem driver is acceptable for most TAPI fax and voice software that uses TAPI pass-through mode. This includes FaxTalk FaxCenter Pro, FaxTalk Messenger Pro, and FaxTalk Multiline Server. If your software uses TAPI pass-through mode, or you don’t require voice operation or Caller ID, you can stop here. The installation of the modem is done.
How do I know if my software uses TAPI pass-though mode? This is not that easy to determine. The developer of the software will know if they use TAPI pass-through mode or not. TAPI pass-through modem simply bypasses TAPI and communicates with the modem directly for some operations. Most applications do not use TAPI pass-though mode.
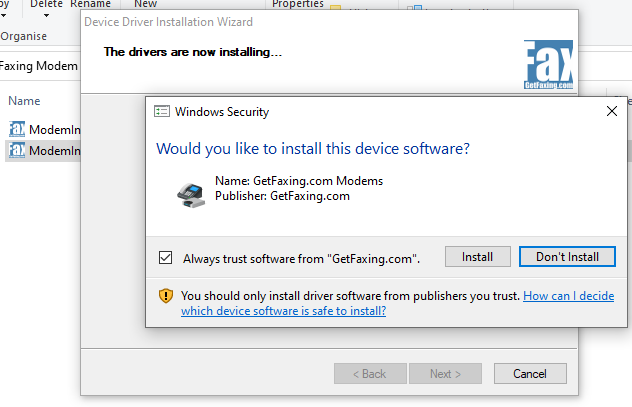
For some voice software that uses direct TAPI, or requires Caller ID, you will need to proceed to the next step and install the GetFaxing.com Voice Modem Drivers.
Installation of voice modem driver.
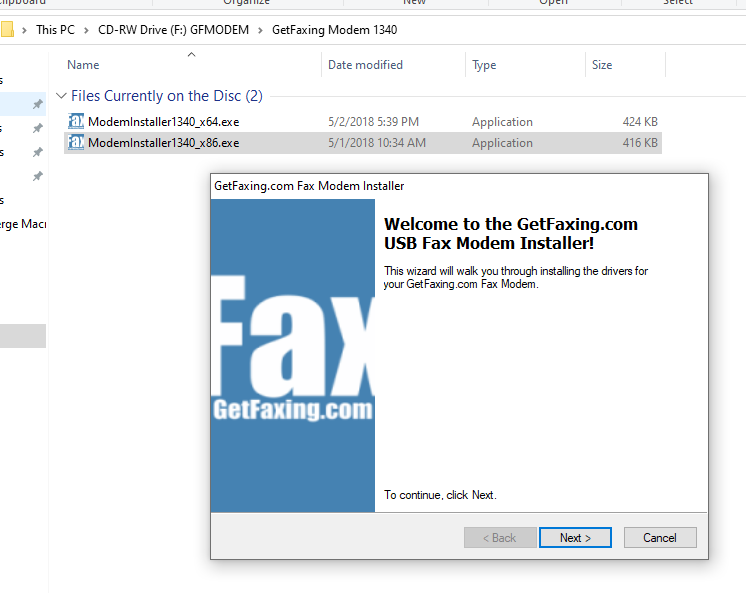
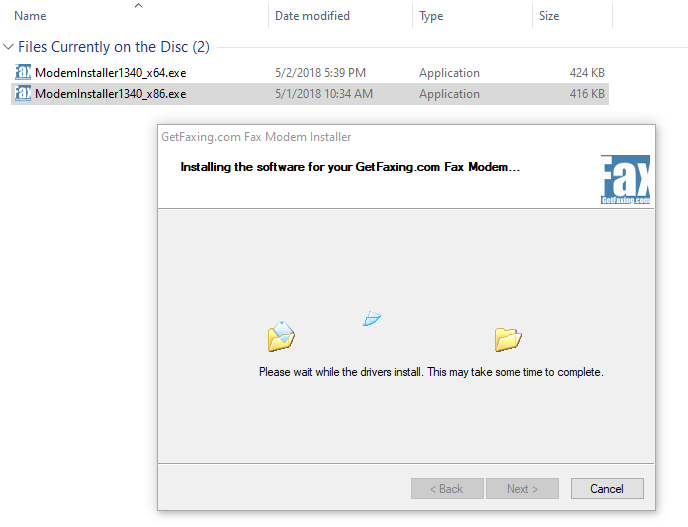
Start the GetFaxing.com modem installation wizard by double clicking the executable file for your operating system. For Windows 11, Windows 10, Windows 8.x and Windows 7 (SP1 plus latest SHA-2 updates) modem installation wizard files are:
ModemInstaller-x64.exe for 64-bit Windows 11, 10, 8.x, 7, Server
ModemInstaller-x86.exe for 32-bit Windows 10, 8,x, 7, Server
NOTE: We recommend you download the drivers from the link provided to you from your original completed order e-mail. Some shipments of modems will also include a CD with a GetFaxing Modem folder. If this folder is not found on your installation CD, download the files from the link included with your “GetFaxing.com <OrderNo> order from <Date> is complete” e-mail.
NOTE: This applies to Windows 7, Windows Server 2008 R2 or older – The software installation file is digitally signed with SHA-2 digest algorithm using a GetFaxing.com certificate. Your operating system must support SHA-2 (also commonly referred as SHA256) to successfully verify the publisher as GetFaxing.com. Windows 7, by default, does not fully support SHA-2 without updates. If the software appears to be unsigned, then following may be true a) you do not have all installed operating system updates to support SHA-2, or (b) your machine does not have updated root certificates to recognize the SHA-2 digest. To update the root certificate, right-click the installations file and click Properties, click the Digital Signatures Tab, select GetFaxing.com from the signatures list, click the Details button. If the digital signature should appears as valid and is signed by GetFaxing.com, now try installing again.
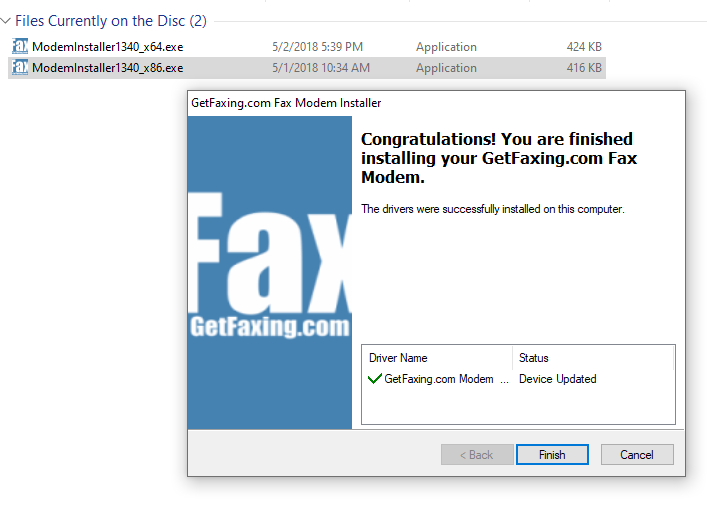
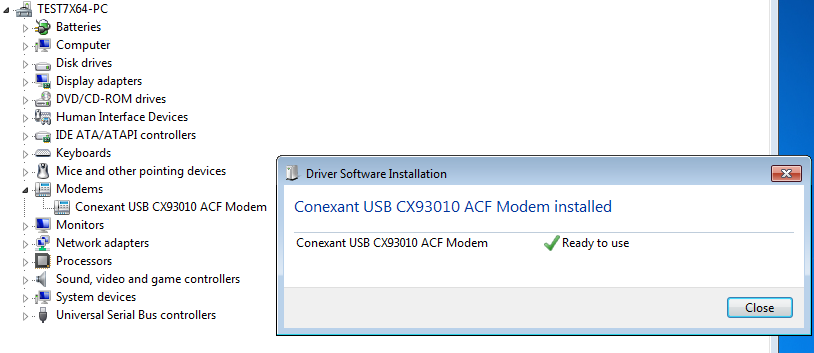
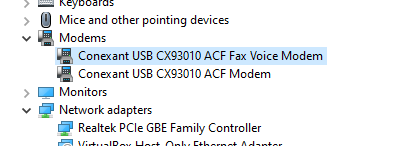
The modem name will now appear in Windows as a Conexant USB CX93010 ACF Fax Voice Modem after a successful installation. This modem name differs from the default modem installed by Windows; Conexant USB CX93010 ACF Modem.
Unimodem Full-Duplex Audio Device.
A Unimodem Full-Duplex Audio device should be present when you successfully install the modem drivers following the steps above. This device is required for voice software and other software using TAPI voice operations. This device is automatically installed with the voice drivers and will appear in the “Sound, video and game controllers” section of the device manager.
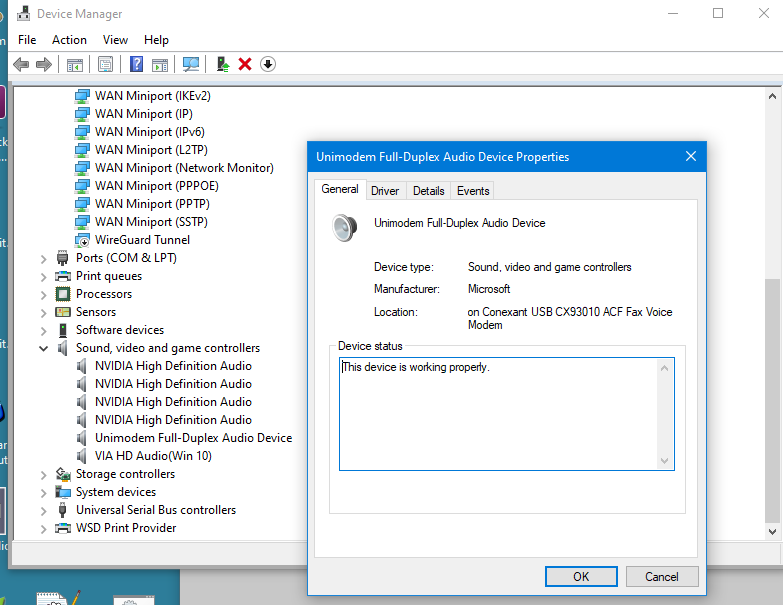
See the instructions under Troubleshooting the Modem for more information on how to view the Device Manager.
Please reboot the machine after installation of the voice modem drivers and read the specific operating system considerations below. You may need to follow extra steps.
Using Windows 11/Windows Server 2025
There are no extra requirements for Window 11. All versions of Windows 11 and Windows Server 2025 should use the ModemInstaller-x64.exe file to install the voice drivers. If any problems are reported, they will be added to this section. Due to constant updates and changes to Windows, we can’t guarantee that future versions of Windows 11 or Windows Server will continue to support these voice modem drivers.
Using Windows 10/Windows Server 2016, 2019, 2022
We always recommended using the latest release version of Windows 10 or Windows Server 2022. Yet, this may not be possible with an older unsupported machine. It may also not be possible with a machine that is not connected to the internet. Windows 10 has several different versions, and you should be aware of which version you are using. There are known problems with some older versions of Windows when using a voice modem. We have included information on the known issues, and the solutions/workarounds below. We can’t guarantee that future versions of Windows 10 or Windows Server will continue to support these voice modem drivers.
NOTE: You can verify your version of Windows 10 by right-clicking Windows Start, Click Run, and type ‘WinVer’ (Or Windows Key+R and type WinVer and press Enter)
Windows 10 Versions 1903 and 1909 need “serwvdrv.dll” registry fix.
Versions 1903 and 1909 Windows 10 have a problem specific with voice modems playback and recording. Microsoft was notified of this problem, and they corrected the issue starting with the release of version 2004. If this version or a later version is available for your device, we recommend you update.
A workaround fix is available if you are using version 1903 and 1909. More information about this fix and instructions are provided here.
Windows 10 Version 1511 requires update.
Windows 10 Version 1511 introduced a voice modem related problem. The Unimodem full duplex or half duplex audio driver would not install with the voice modem. If you are using this version, you should update to Version 1607 or later. More information and a workaround fix for Version 1511 is available here
Using Windows 8, Windows Server 2012, Windows 8.1, Windows Server 2012 R2.
Use the appropriate install file to install the voice drivers for these operating systems. We no longer support Windows 8, Windows 8.1 or Windows Server 2012/R2. There are no extra requirements.
Using Windows 7 or Windows Server 2008 R2.
We no longer support Windows 7 or Windows 2008 R2 server installations. Here is more information if you are having difficulty installing using Windows 7 or 2008 R2 Server.
Ensure you have all the latest security updates to support SHA-2 signing before attempting to install the modem drivers. If you try to install the drivers without SHA-2 support in the operating system, the installation files will not be detected as digitally signed. Consequently, they will be blocked from installing.
NOTE: Legacy OS versions (Windows 7 SP1, Windows Server 2008 R2 SP1 and Windows Server 2008 SP2) are required to have SHA-2 code signing support installed on their devices to install updates released on or after July 2019. Any devices without SHA-2 support will not be able to install Windows updates on or after July 2019.
You can verify if your operating system is updated to support SHA-2 by right-clicking the Modem Installer exe file. Click Properties, click the Digital Signatures tab. Select GetFaxing.com from the signature list and Click the Details button. This will verify the digital signature, update the root certificate and confirm your system will support SHA-2.
More information from Microsoft here.
Stand Alone security updates KB4474419 and KB4490628 released to introduce SHA-2 code sign support.
Support for Windows Vista, Windows 2008 Server, Windows XP, Windows Server 2003 or earlier.
The voice drivers do not support these or earlier OS. You can install the default Windows drivers for these OS.
Troubleshooting the Modem.
1. Cold Reboot the computer.
In some installations, the modem driver requires a cold reboot. If you have not cold rebooted the computer. To “cold” reboot, we recommend you power down the computer. Wait 10 seconds, turn it back on.
2. Remove all earlier (old) fax modem drivers.
If you are replacing a modem, you should uninstall any software drivers for that modem. Multiple fax modem drivers from different models of fax modems can cause unreliable and unstable results in Windows. Look in the Add/Remove Apps and Add Remove Programs. Check the Device Manager. Remove specific fax modem drivers that are no longer being used. Once you’ve done this, check the Device Manager to view and uninstall orphaned modem drivers.
To open the Device Manager in Windows.
Open the “Run” dialog box by pressing and holding the Windows icon key, then press the R key (“Run”).
In the open prompt, type devmgmt.msc and Click OK.
NOTE: In Windows 10 or 11 you can right-click the Windows icon on the desktop and select “Device Manager” from the pop-up window to open the Device Manager.
In Device Manager, click View, Devices By Type. (make sure there is a check mark).
Click on View, Show Hidden Devices (make sure there is a check mark)
Click on Modems.
Right click on the specific modem in the list and click Uninstall. If you no longer use this modem you should check the option to remove the driver files.
3. Disable other application(s) that use the modem.
Some modem applications may conflict with proper operation existing software that may use the modem. Disable and make sure other applications are not attempting to access the modem.
4. Insert modem to a direct USB 2.0 or 1.1 port.
USB hubs or extensions may cause communication problems. Install the USB Modem directly to a USB 3.0, 2.0 or 1.1 port on the computer. Recommended is a USB 2.0 or 1.1 port. If you have problems with connecting to a USB 3.0, we recommend trying a legacy USB port instead.
5. Disable Power Saving options in Windows.
Some modems can lose power when power saving mode is activated. If the modem does not answer calls after being inactive, disable all power saving features in Windows temporarily.
Troubleshooting Software
CallClerk
The latest releases of CallClerk do not support Windows 7 or older OSes. For legacy OSes, use version 6.1 of CallClerk.
Not answering or detecting calls
CallClerk is a TAPI application. It allows sharing with other TAPI compatible software. However, some software may take priority of the modem. This can prevent CallClerk from answering or detecting an incoming call.
Modem is not detected in CallClerk.
Quit CallClerk by right clicking the CallClerk icon in the system tray. Click Exit. Restart CallClerk, right-click the CallClerk icon and click Settings. Click Modem tab. Under Mode of Operation, select “Use TAPI“, select the modem “Conexant USB CX93010 ACF Voice Fax Modem” from the modem configuration drop-down list. Click Apply, click OK.
Adjusting the volume.
CallClerk technical support is available at www.callclerk.com. Below is some information on how to adjust the online volume settings of the voice modem.
CallClerk does not have a recording volume control setting, but you can adjust the recording gain of the voice modem by setting the +VGR= value. If you find that recordings from your callers are too low when played back, you can increase the +VGR value accordingly. Values are 0-255. Default value is 128 which is the normal gain value.
The volume level for the incoming caller is the transmitted playback. If your transmitted playback volume is too low or too high, you can adjust using the +VGT= value. Values are 0-255, but recommended values are between 120 – 136. Default value is 128 which is the normal playback gain value.
Since +VGR= and +VGT= are voice commands, you must be in Voice Mode before this command can be sent to the modem. The +FCLASS=8 command sets the modem to voice mode and must be sent to the modem before the +VGR= or +VGT= value. To avoid problems with other software expecting the initial state of the modem to be data, we set the modem back to the default class with a +FCLASS=0 command. To ensure Caller ID remains enabled, we set +VCID=1
Here is an example of Extra Initialization command:
ATE0;+FCLASS=8;+VGR=255;+VGT=128;+FCLASS=0;+VCID=1
You can add this to the Extra Initialization command within Phone & Modem Properties. Click the Advanced Tab (next to Diagnostics) to enter the Extra Initialization command line. If you are unable to change this, click on the General Tab and click the Change Settings button.
Command breakdown
Note: Multiple modem commands are included a single line, and each command is separated by a semi-colon.
ATE0 = Attention modem command followed by Echo off.
+FCLASS=8 = Set modem to voice class mode
+VGR=255 = Set recording gain to highest value (255)
+VGT=128 = Set the playback gain to default value (128)
+FCLASS=0 = Set modem to default class mode.
+VCID=1 = Turn on Caller ID.
FAQ
Q: Where do I download the voice modem drivers?
A: When you purchase the Conexant Fax Voice Modem from GetFaxing.com they will be included as a download link in your completed/shipped order e-mail. In some shipments, you’ll also receive a CD-ROM or DVD with the drivers and bundled trial FaxTalk/Caller ID software.
Q: Does the voice/fax modem detect the Caller ID of an incoming caller when I am currently on an existing call?
A: This feature is called Call Waiting Caller ID, Type II, or Type 2 Caller ID. This type of caller ID is not supported. While most desktop and cordless telephones with Caller ID can provide support for Type II caller ID, many (if not all) fax/voice modems do not include this Type II support. In addition, the Microsoft Windows TAPI interface does not include support for type II caller ID.
Q: Why can’t I hear the audio call progress of a call that I make? or hear the caller on my speakers?
A: Some modems have the ability to provide audio progress when a number is dialed and you can talk via a microphone. These Conexant modems do not have speakerphone, audio call progress, or microphone support and the voice drivers included do not support this. Some modems do have a piezo-electric speaker that allows you to hear call progress, but these speakers are not for voice playback. You can record and playback audio through the telephone line using the modem. Recorded messages can be played back through your computer speakers. If you use the modem to dial your voice calls, you will need to have a telephone handset extension as your microphone/speaker. For dual jack modems you can attach the extension to the 2nd port, if you have a single port modem you will require a telephone splitter or attach the phone on another telephone jack connected to the same telephone line.
Q. Is CallClerk software still available?
A: Unfortunately, CallClerk is a discontinued product and no longer available.
no comments